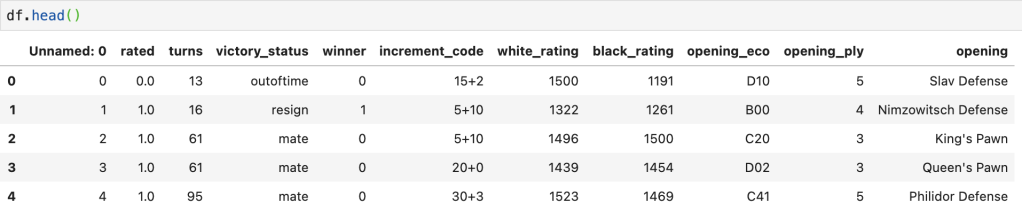
Pokemon: EDA and Battle Modeling

Exploratory data analysis and models for determining which Pokemon tend to have the biggest pure advantages in battle given no items in play.

CHARIZARD

Thanks for visiting my blog today!

Context

Pokémon is currently celebrating 25 years in the year 2021 and I think this is the perfect time to reflect on Pokémon from a statistical perspective.

Introduction

If you’re around my age (or younger), then I hope you’re familiar with Pokémon. It’s the quintessential Gameboy game we all used to play as kids before we started playing “grown-up” games on more advanced consoles. I remember how excited I used to get when new games would be released and I remember equally as well how dejected I was when I lost my copy of the Pokémon game “FireRed.” Pokémon has followed a basic formula running through each iteration of the game, and it’s pretty simple. It revolves around creatures known as “Pokémon.” You start with a “starter” Pokémon who usually has high potential but starts with very little power and you then can catch Pokémon, train Pokémon, buy items, beat gym leaders, find “legendary” Pokémon (I suppose the word “Pokémon” works as singular and plural), create a secret base, trade Pokémon with other gameboy owners, and of course – beat the Elite 4 like 500 times with different parties of Pokémon. With each new set of games (games were released in sets usually labeled by a color – silver & gold and green & red – as two examples), came a new group of Pokémon. The first generation was pretty bland. There were some cool ones like Charizard, Alakazam, and Gyarados but there were far more weird and boring ones like Slowpoke (Slowpoke has got to be the laziest name ever), Pidgey (second most lazy name?), and Arbok (Cobra backwards, yes it’s a snake). As the generations of Pokémon new to each set of games progressed there was a lot more diversity and creativity. Some generations like Gen 2 and Gen 3 really stuck out in my head. Examples include Skarmory and a special red (not blue) Gyarados in Gen 2 and Blaziken and Mightyena in Gen 3. The most important part of the Pokémon games are battles. Pokémon grow in skill and sometimes even transform in appearance through battling and gaining experience. You also earn badges and win prize money through battles. Battles are thrilling and require planning and tactics. This is expressed in many ways; the order of your Pokémon in your party, the type of Pokémon you bring to counteract your potential opposing Pokémon, the items you use to aid you in battle, when you choose to use certain moves (there is a limit to the amount of times each move can be used), switching Pokémon in battle, sacrificing Pokémon, diminishing the health of a “wild” Pokémon to the point where it doesn’t faint but is weak enough to be caught, and there’s a lot more I could probably add. Ok, so the point of this blog is to look for interesting trends and findings through visualizations in the exploratory data analysis section (EDA) and later I will examine the battles aspect and look for key statistics that indicate when a Pokémon is likely to win or lose a battle.

Let’s get started!

Data

My data comes from Kaggle and spans about 800 Pokémon across the first 6 generations of the series. I’d like to quickly note that this includes mega-Pokémon which are basically just more powerful versions of certain regular Pokémon. Let me show you what I mean; we have Charizard at the top of this post and below we have mega-Charizard.

3D Printed Mega Charizard X - Pokemon by Gnarly 3D Kustoms | Pinshape

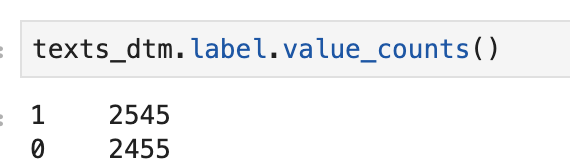
Yeah, it’s pretty cool. Anyway, we also have legendary Pokémon in this dataset but, while legendary Pokémon may have mega types, they are not a fancy copy of another Pokémon. I’ll get more into how I filtered out mega Pokémon in the data prep section. One last note on Pokémon classes – there are no “shiny” Pokémon in this data set. Shiny Pokémon are usually not more powerful than their regular versions but they are more valuable in the lexicon of rare Pokémon. Next, we have 2 index features (why not just 1?). Pokémon are by construction at least one “type.” Type usually connects to an element of nature. Types include grass, poison, and fire (among others) but also less explicit and nature-related terms such as dragon, fairy, and psychic. A Pokémon can have up to two types with one usually being primary and the other secondary. Type is a critical part of battles as certain types have inherent advantages and disadvantages against other types (fire beats grass but water beats fire, for example). Unfortunately, creating a dataset containing battle data between every possible Pokémon would be a mess and we therefore are going to use the modeling section to see what types of Pokémon are strongest in general, and not situationally. Our next features will be related to Pokémon stats. HP – or hit points – represent your health. After Pokémon get struck with enough attack power (usually after a couple turns), their HP runs out and they faint. This takes me to the next four features: attack, defense, special attack, and special defense. Attack and defense are the baseline for a Pokémon’s, well… attack and defense. Certain moves may nullify these stats though. A great example is a one-hit knockout move; attack doesn’t matter at all. Special attack and special defense are the same as attack and defense but refer to moves where there is no contact between Pokémon. So a move like “body slam” is attack-based while a move like “flamethrower” is special attack based. Total represents the sum of HP, special attack/defense, attack/defense and speed. Speed is a metric that basically determines who strikes first in battle. Occasionally some moves will take precedence and strike first but in the absence of those moves the turn-based battle begins with the attack of the faster Pokémon. The feature generation refers to which generation between 1 and 6 that the Pokémon in question first appeared in. Pokémon often make appearances in later generations once introduced in a previous generation. This is sometimes the case for legendary Pokémon as well. This takes us to our next feature which is a binary legendary Pokémon indicator. Legendaries are Pokémon that appear once per game usually in one specific spot that are generally quite powerful (and cool-looking). There are “roaming legendaries” that are unique but will appear at random locations until caught as opposed to being confined to one special location. Most legendaries are delegated to specific areas at specific points in a game’s storyline. Latios and Latias, from Pokémon Ruby and Sapphire are roaming and are incredibly hard to locate and subsequently catch while Groudon and Kyogre are easier to find and catch and play a key role in the storyline of their respective games. Finally, our last feature is win rate (and it’s continuous) – and that is the target feature. I added some features to the dataset which will be discussed below. The only one I’ll mention now is that I binned win rate into three groups in order to have a discrete model as well.

Data Preparation

This section will outline how I manipulated my data for modeling purposes. I started by dropping extra columns like the index feature. Next, I created a feature which was a binary representation of whether a Pokémon was of one or two types. I also scanned the data to see if the word “mega” appears in any names and added a feature to indicate if a Pokémon was or was not a mega type. In addition to the collective data I also separated datasets into common, mega, and legendary Pokémon while aiming for no overlapping Pokémon. I had enough data where I could comfortably delete all rows with null values. I added another feature as well to measure the ratio of special attack divided by attack and did the same with defense. I originally thought special attack meant something different than what it actually means and ended up calling these features “attack bonus” and “defense bonus.” Next, I filtered out any rows containing numerical outliers which would be 2.5 standard deviations away from the rest of the data in said feature. This reduced my data by about 15%. Next, I applied max-absolute scaling to gauge the value of each data point relative to the other values in each feature (this puts every result somewhere between 0 for low and 1 for high). I also noticed through hypothesis tests that speed might have an outsized impact on battle outcome (more on this later) so created an extra feature called “speed ratio” to reflect how much of a Pokémon’s total comes from speed alone. To deal with categorical data, I leveraged target encoding. I published an article on Towards Data Science which can be found here if you would like to learn more about target encoding. This was the end of my main data prep. I did a quick train-test-split which pertains more to modeling but is technically an element of data prep.

EDA

This section contains a sampling of all the exciting graphs to describe what Pokémon has looked like over the years.

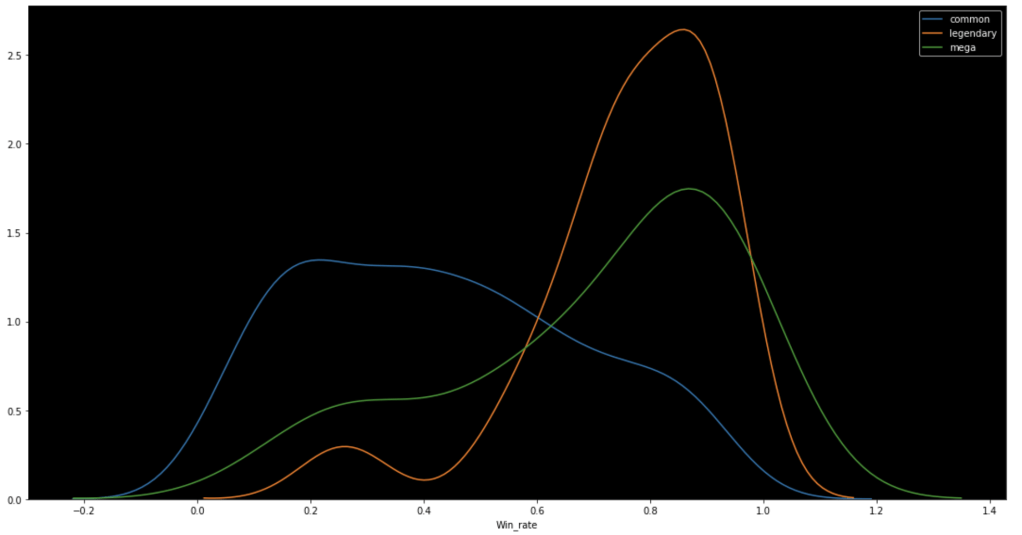
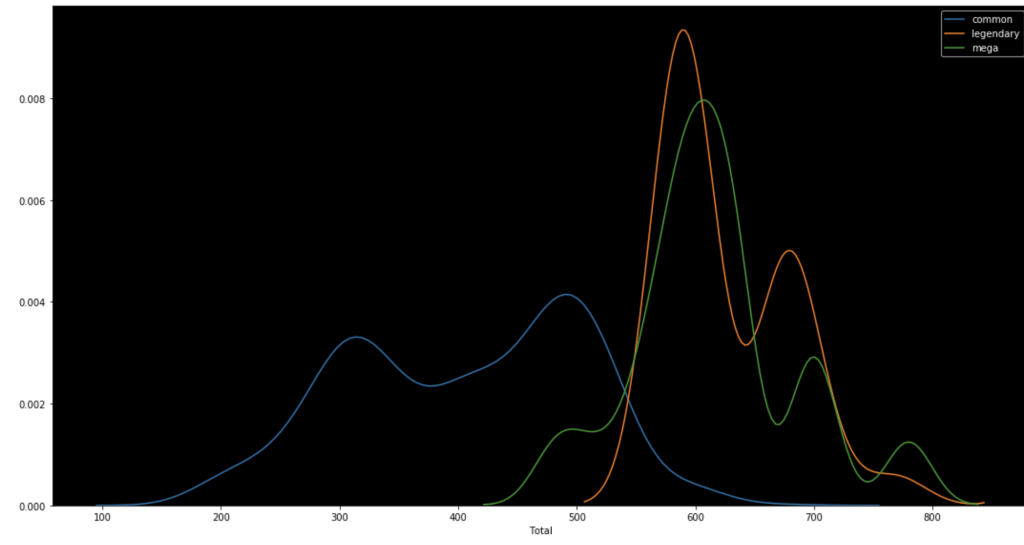
The following graph shows the distributions of win rate and total stats respectively segmented by Pokémon class.

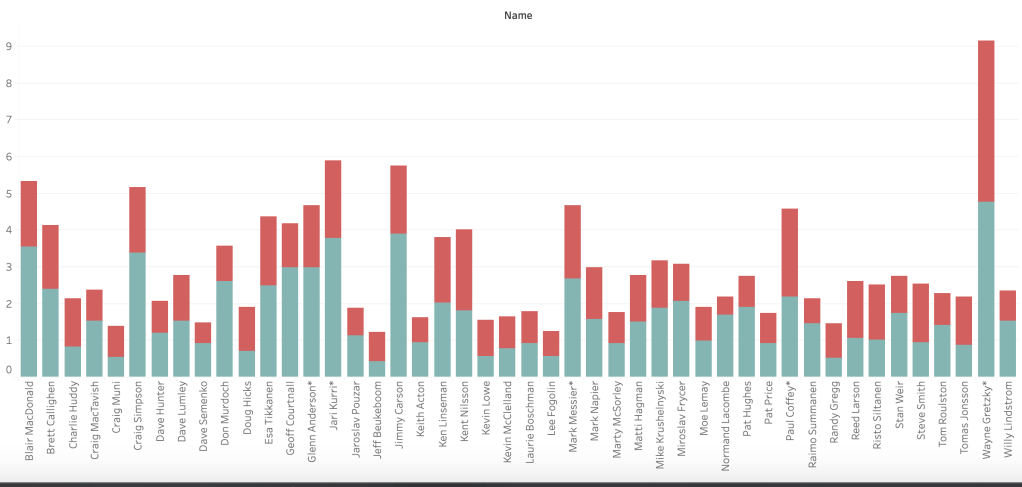
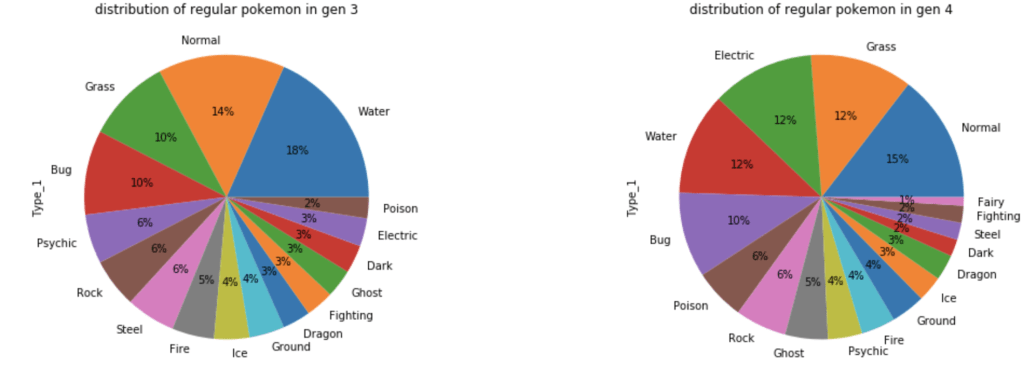
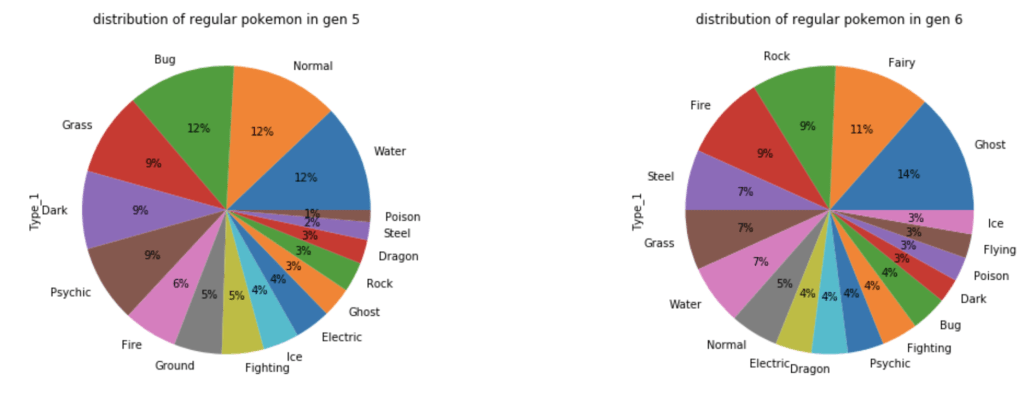
The following graph shows how many Pokémon appear for each type:

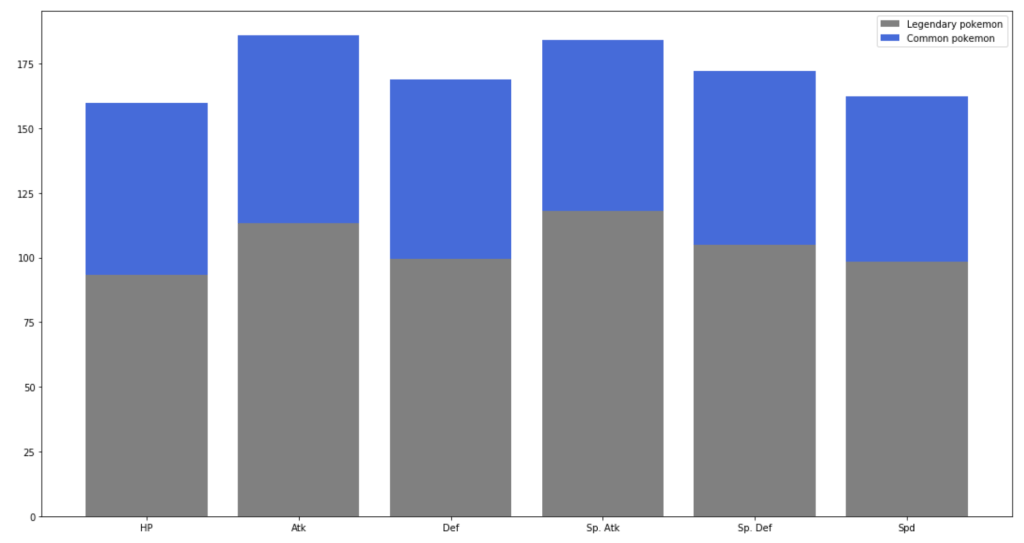
The graph below shows the difference between stats of legendary Pokémon and regular ones.

And next…

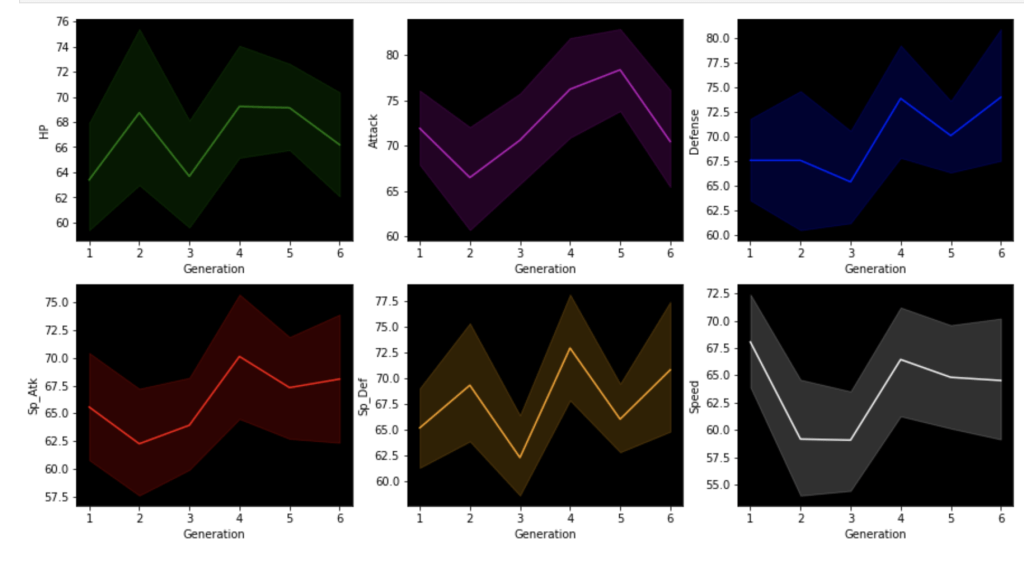
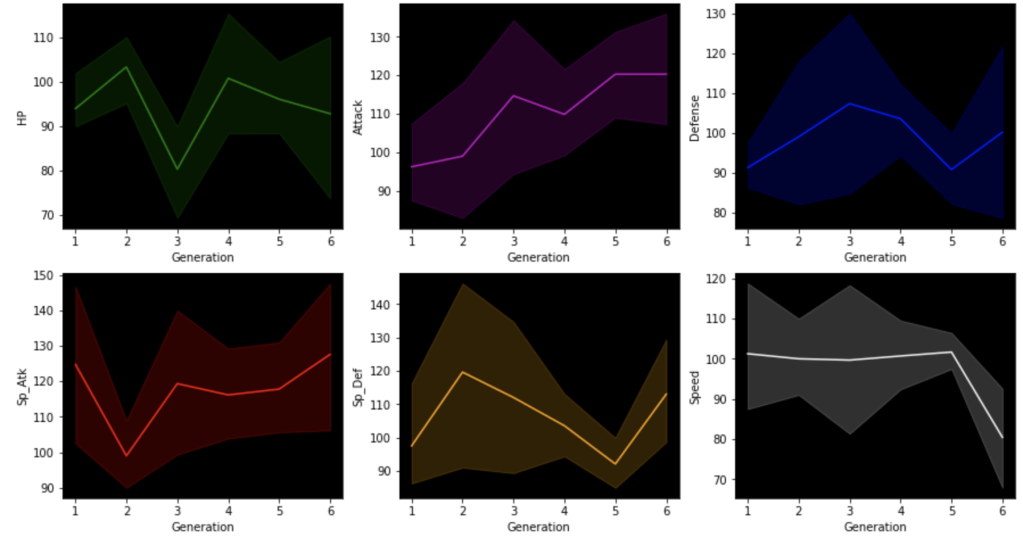
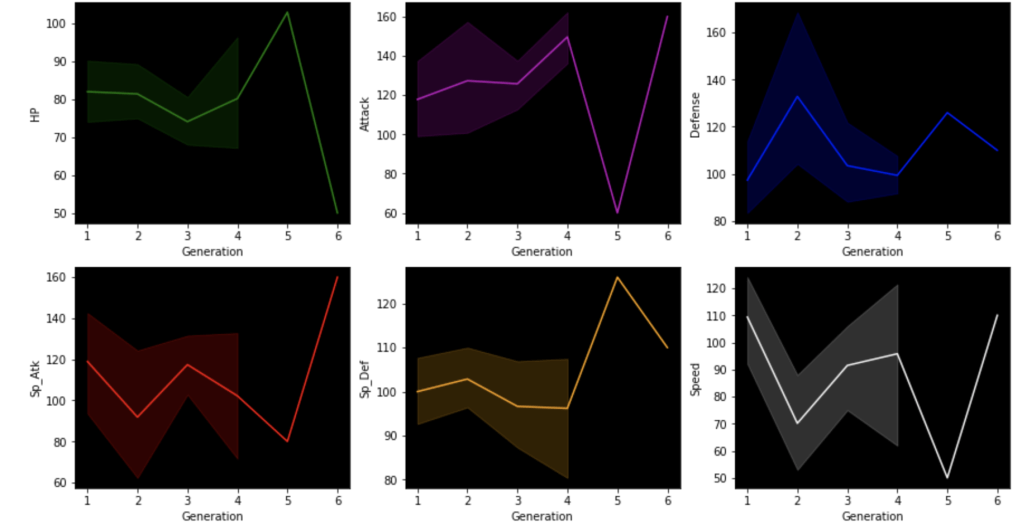
This next set of visuals show trends over the years in common, legendary, and mega Pokémon respectively.

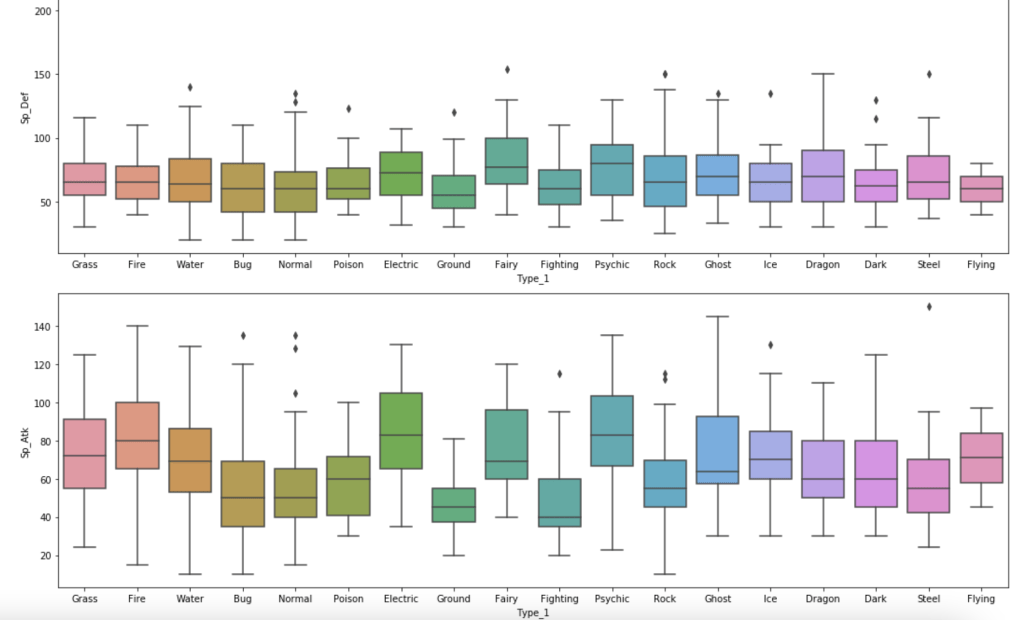
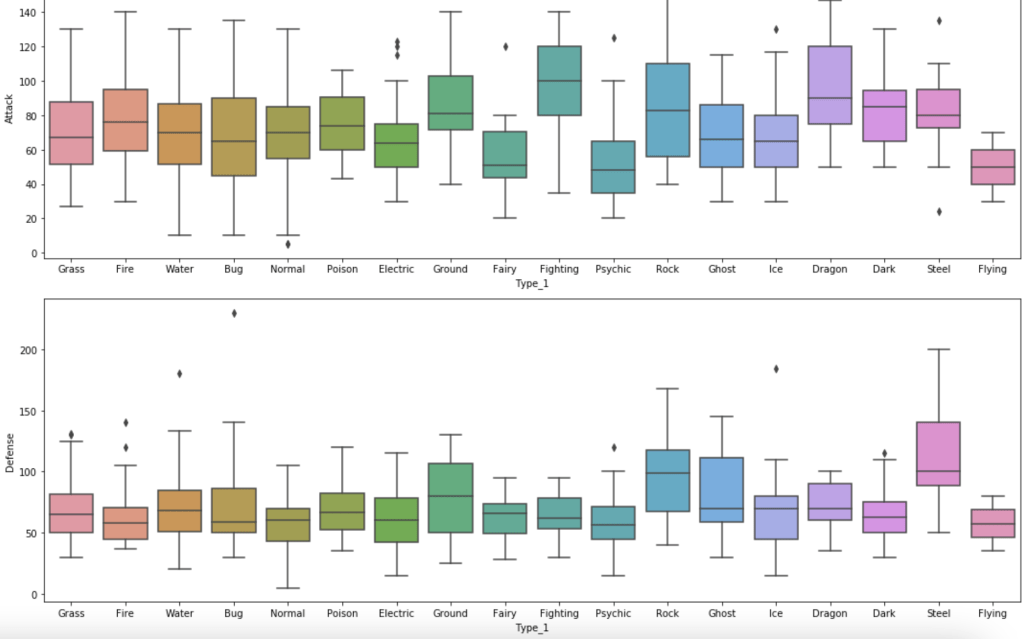
The next series of charts shows the distribution of stats by type with common Pokémon:

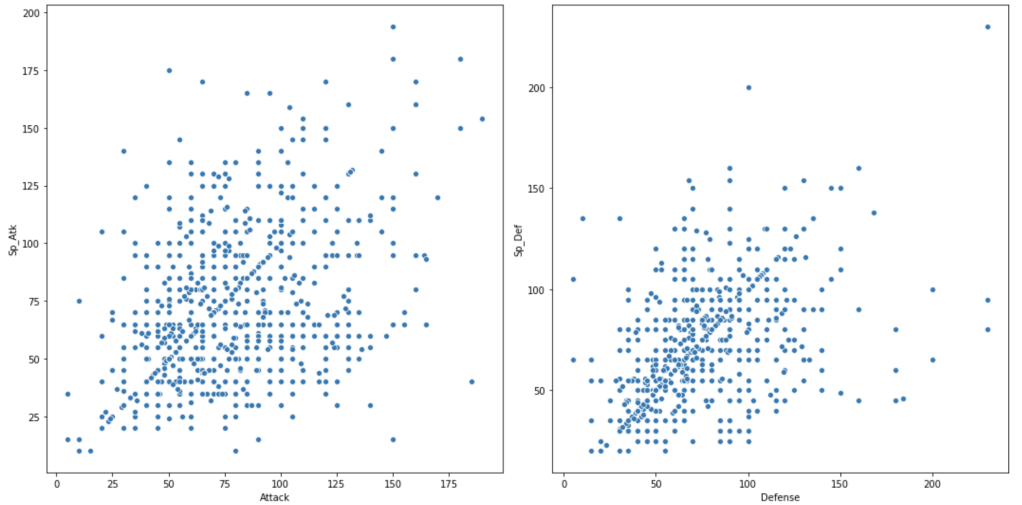
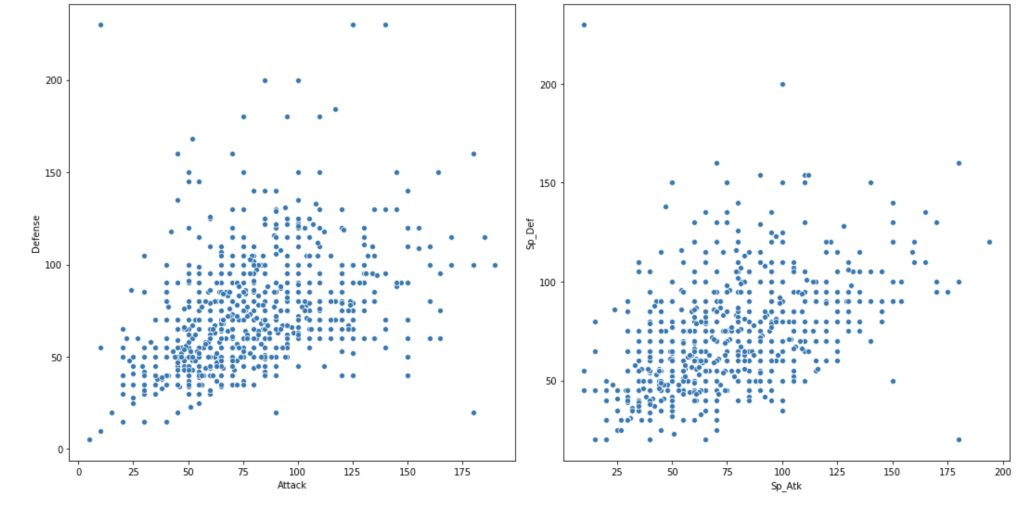
Next, we have scatter plots to compare attack and defense.

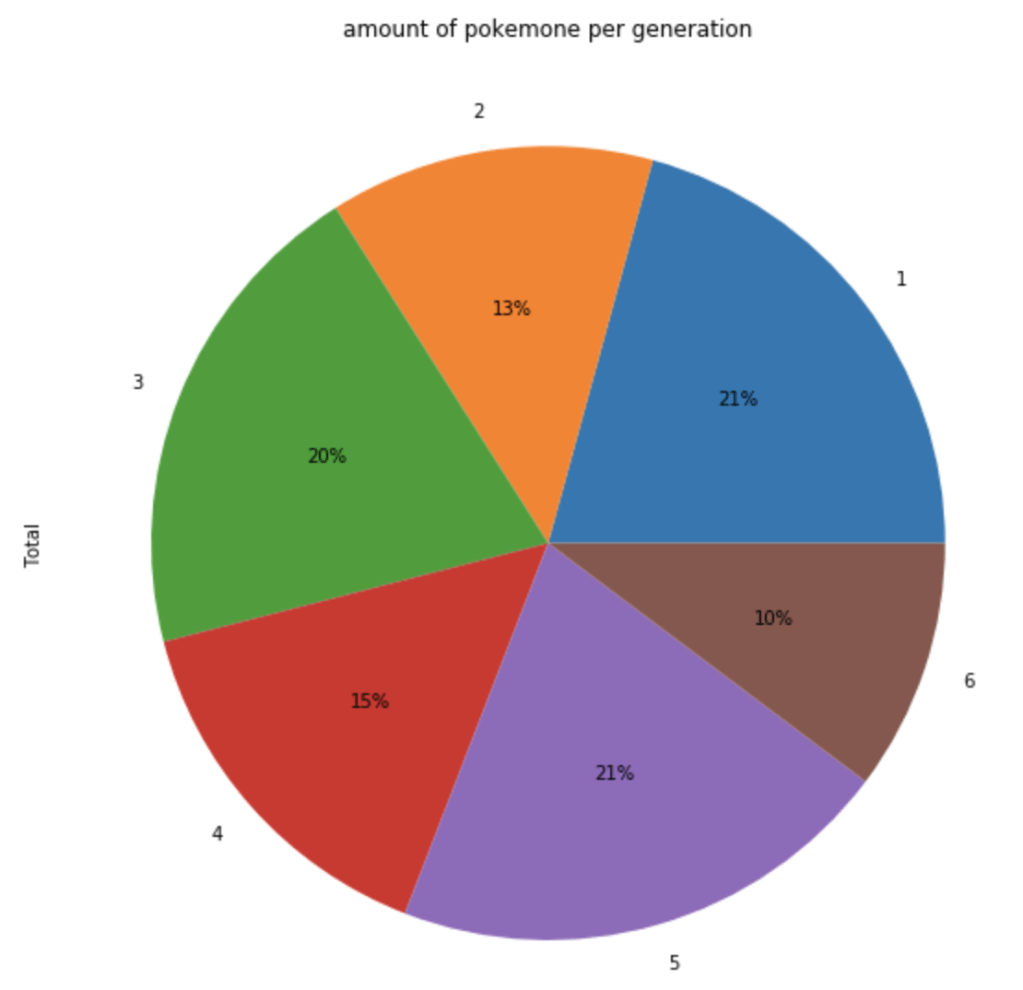
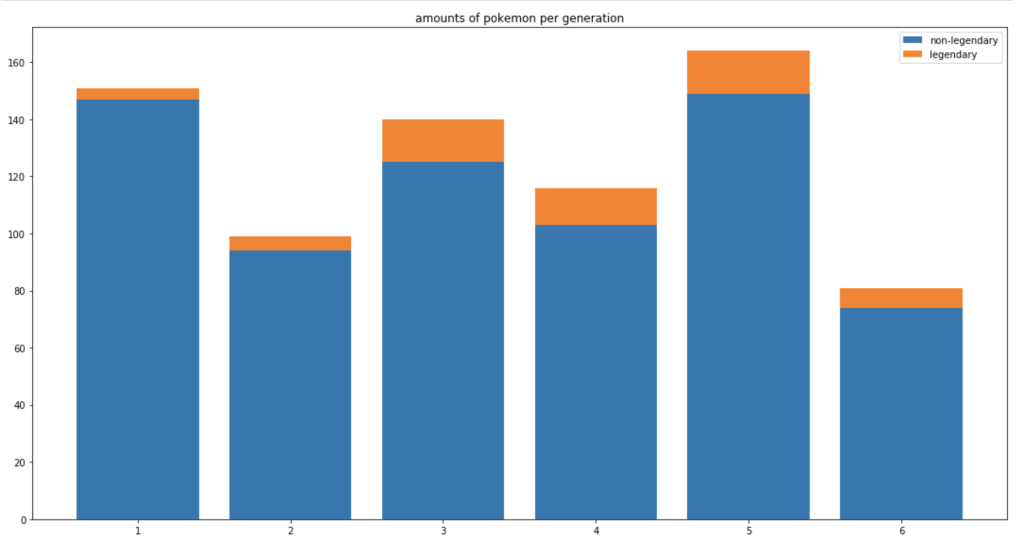
The next chart shows the distribution of total Pokémon across 6 generations.

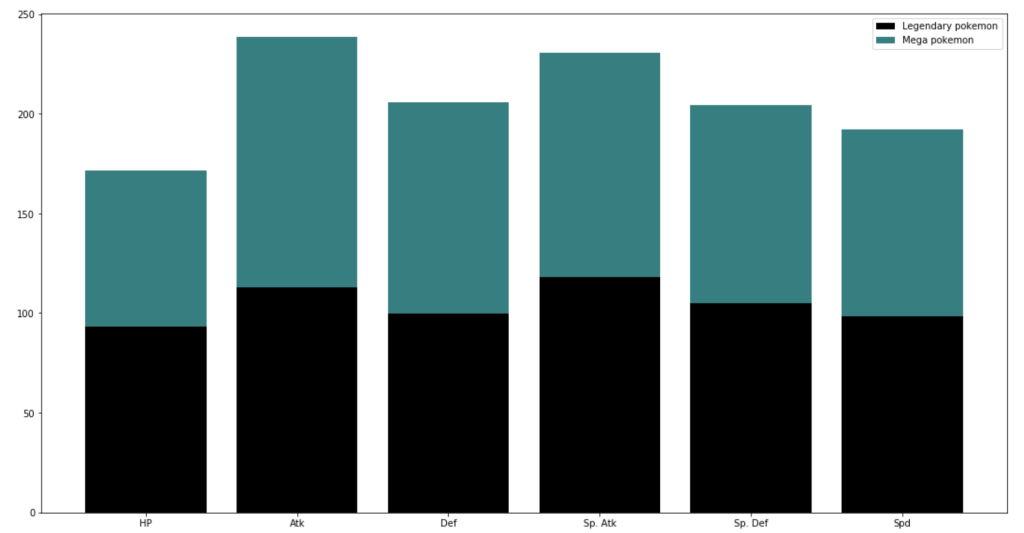
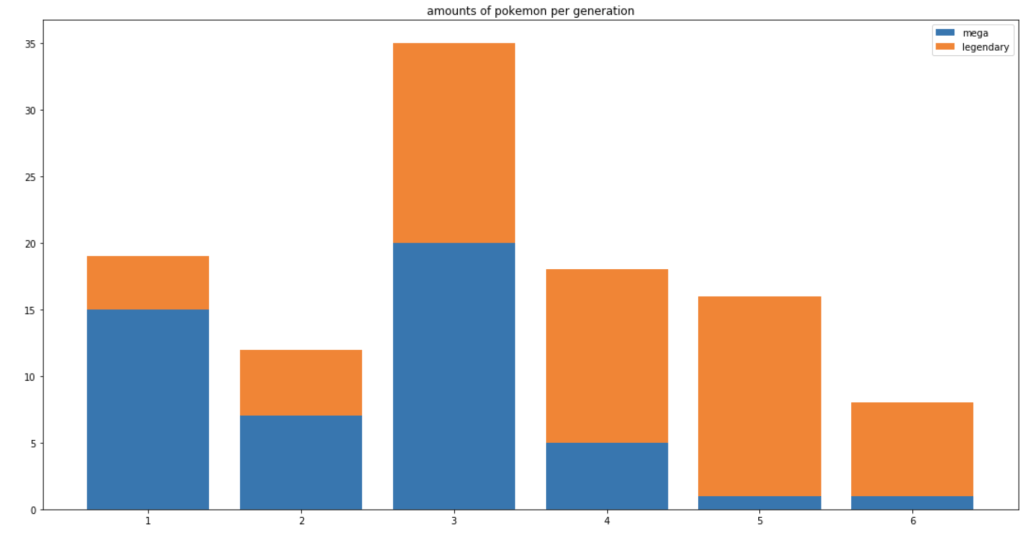
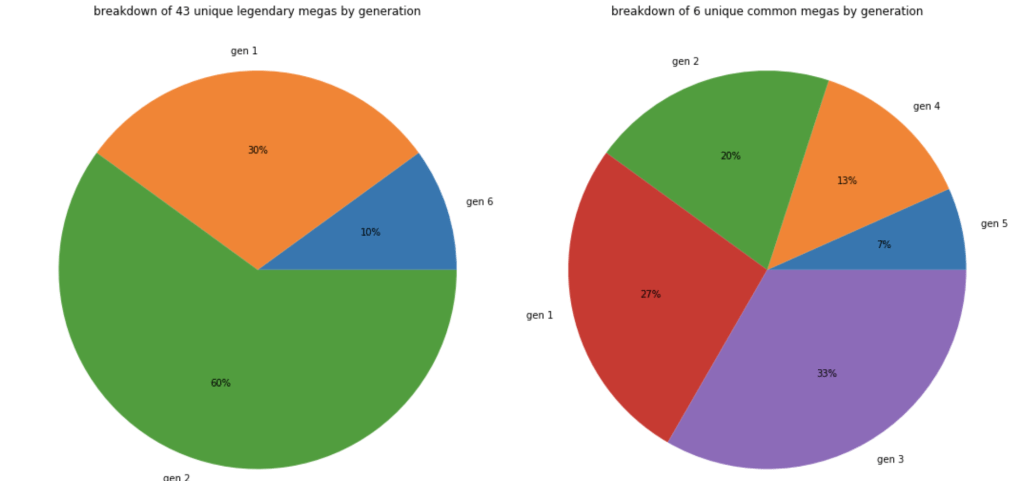
Let’s look at legendary and mega Pokémon.

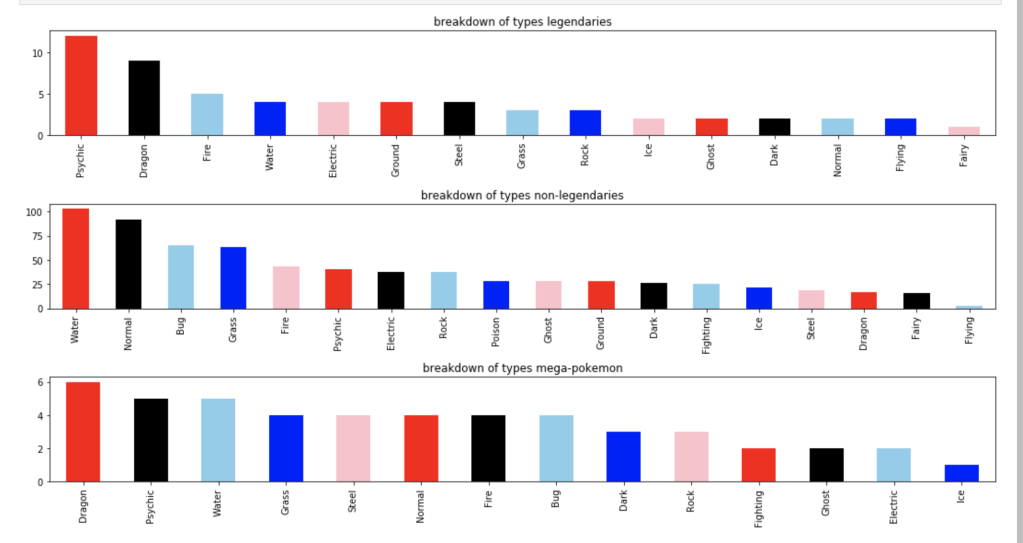
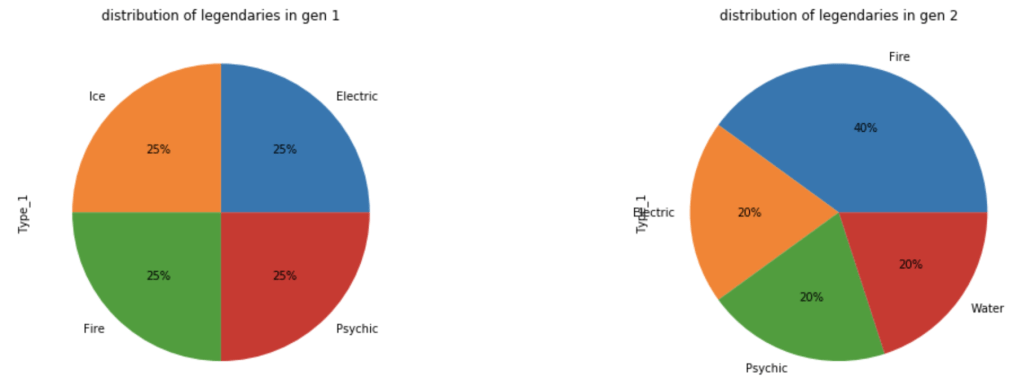
Let’s look at how these legendaries are distributed by type.

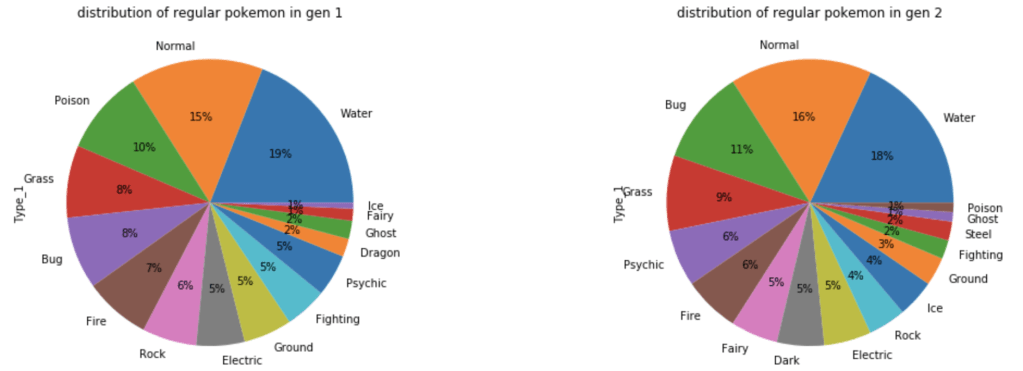
What about common Pokémon?

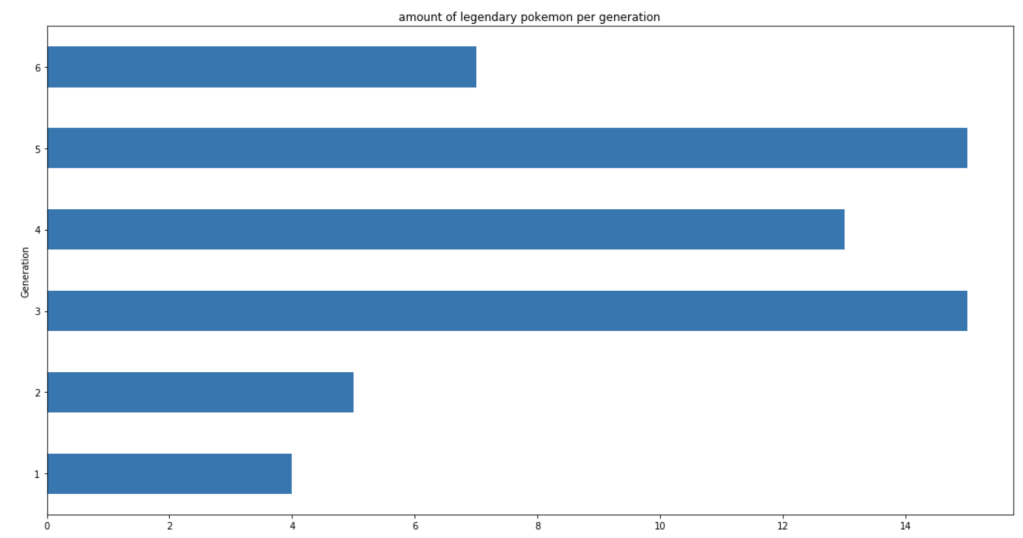
The next group of visuals shows distribution of stats by generation among legendary Pokémon.

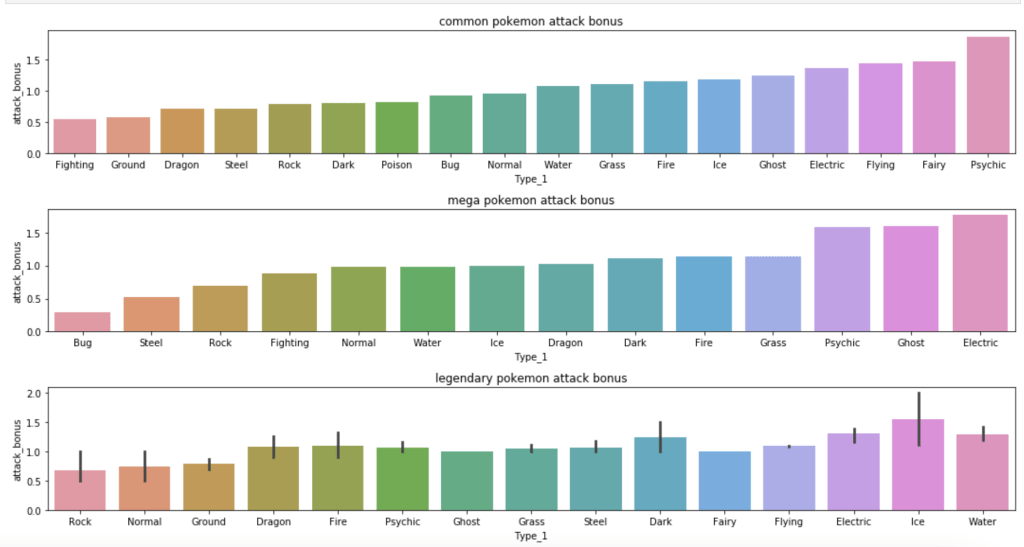
The next set of visuals shows which Pokémon have the highest ratio of special attack to attack

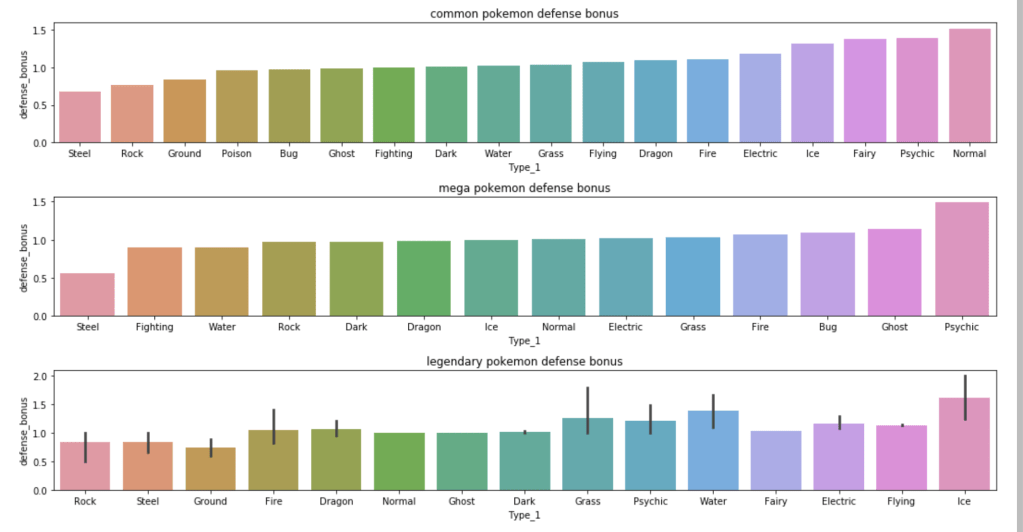
The next set of visuals shows which Pokémon have the highest ratio of special defense to defense

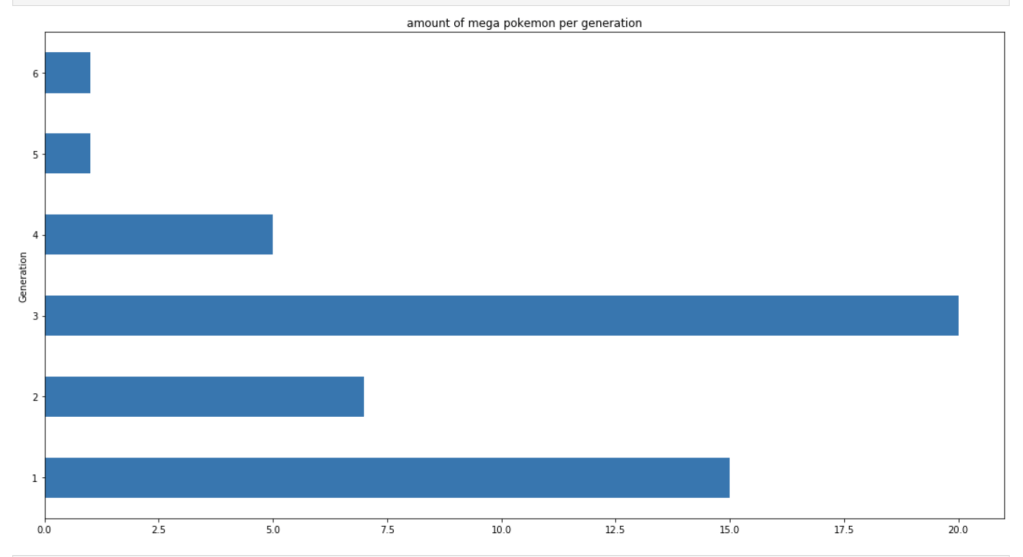
This next set of charts show where mega Pokémon come from.

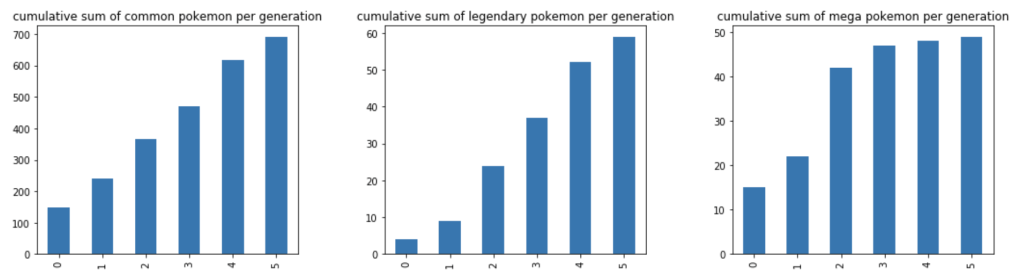
Next, we have a cumulative rise in total Pokémon over the generations.

Models

As I mentioned above, I ran continuous models and discrete models. I ran models for 3 classes of Pokémon: common, legendary, and mega. I also tried various groupings of input features to find the best model while not having any single model dominated by one feature completely. We’ll soon see that some features have outsized impacts.

Continuous Models

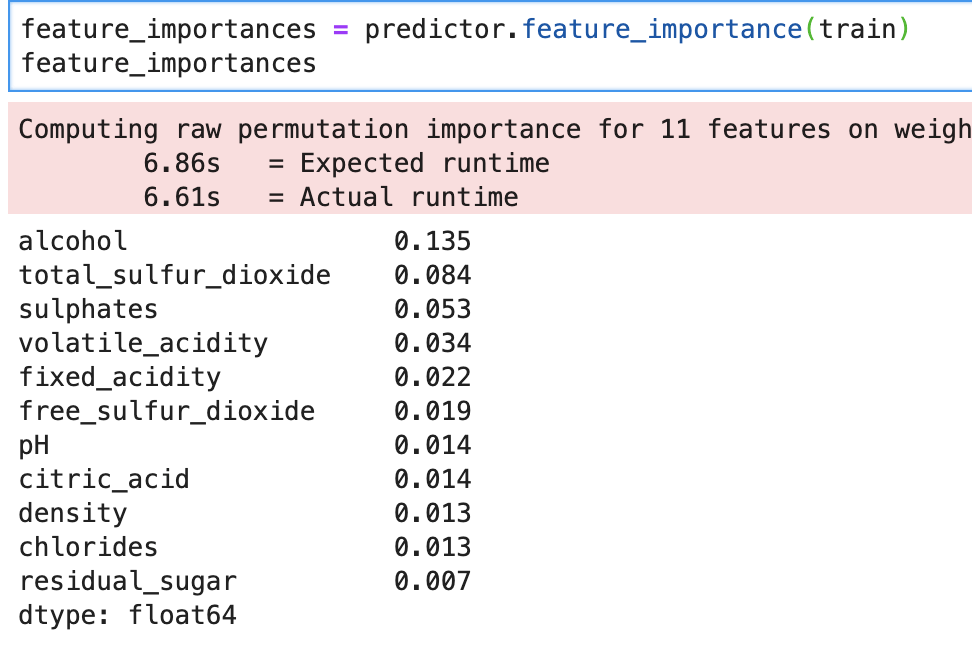
The first and most basic model yielded the following feature importance while having 90% accuracy:

Speed and speed ratio were too powerful, so after removing them my accuracy dropped 26% (you read that right). This means I need speed or speed ratio. I chose to keep speed ratio. Also, I removed the type 1, type 2, generation, and “two-type” features based on p-values. Now, I had 77% accuracy with the following feature ranks.

I’ll skip some steps here, but the following feature importances, along with 75% accuracy, seemed most satisfactory:

Interestingly, having special attack/defense being higher than regular attack/defense is not good. I suppose you want a Pokémon’s special stats to be in line with regular ones.

I’ll skip some steps again, but here are my results for mega and legendaries within the continuous model:

Legendary with 60% accuracy:

Mega with 91% accuracy:
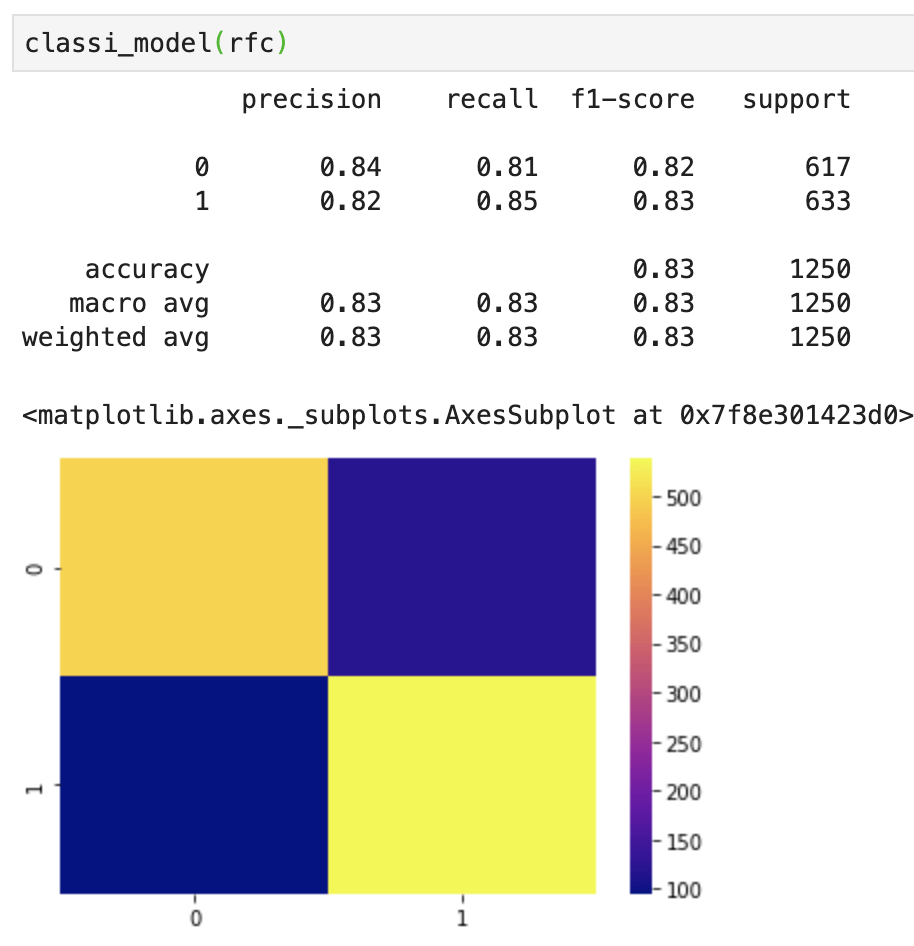
Discrete Models

First things first – I need to upsample data. My data was pretty evenly balanced but needed minor adjustments. If you don’t know what I mean by target feature imbalance, check out my blog (on Towards Data Science) over here. Anyway, here comes my best model (notice the features I chose to include):

This shows a strong accuracy at 80% along with a good confusion matrix and interesting feature importances. For more information on what the metrics above, such as recall, actually mean, check out my blog over here.

Next Steps

One-Hot Encoding. I think it would be interesting to learn more about which specific types are the strongest. I plan to update this blog after that analysis so stay tuned.

Neural Network. I would love to run a neural network for both the continuous and discrete case.

Polynomial Model. I would also love to see if polynomial features improve accuracy (and possibly help delete the speed-related features).

Conclusion

For all you Pokémon fans and anyone else who enjoys this type of analysis, I hope you liked reading this post. I’m looking forward to the next 25 years of Pokémon.

Introductory NLP Models

Building your first Natural Language Processing-based classification model.

Image result for nlp

Thanks for stopping by today!

Introduction

A popular and exciting application of data science programming is understanding language and the way people speak. Natural Language Processing (NLP) is a field within data science that examines all things language-related. This could be assigning a movie rating from 1-10 based on a review, determining whether an email is or is not spam, gauging sentiment across a span of song lyrics or an opinion article, and anything else you can think of. It’s interesting to transform a sentence, like “the weather is nice today” into an outcome or classification. We can deconstruct this sentence first by taking out words like “the” and “is” that don’t really matter. Next we probably don’t need the word “weather” if it’s understood that we are discussing the weather. So what we’re left with is “good today.” That tells us something about the moment, it has good weather. and that it is not necessarily indicative of the rest of the week or month. This is a really simple sentence and can probably be deconstructed in other ways as well. A more interesting sentence is the following movie review: “the movie wasn’t good.” Let’s repeat our process: delete the words “the” and “movie.” Next we have the word “wasn’t,” a word that implies some sort of negation, and the word “good,” which implies a positive sentiment. Conveniently, we can build and train models to investigate groups of text and come away with solutions at high accuracies. Today’s post will be a basic walkthrough of what can be an introductory model for NLP.

Goals and Data Source

For this post on an introduction to NLP, we will investigate movie reviews and try to predict whether a review is or is not a positive review. My data can be found on kaggle.com and contains only 2 important features. The data describes texts and labels. Label 1 means a good review and label 0 means a bad review. Let me add a quick note before we get started with all the code: I’m not so familiar with NLP projects and am not great or as creative with NLP. I say this not as a disclaimer but rather to show readers that setting up and solving NLP-based projects is not as difficult or complex as it may seem (but yeah – it’s not that easy).

Coding Process

Setup

The setup above should look pretty simple. We import some packages to get going. If you don’t know all these libraries, I won’t waste your time and will focus on the ones that matter most. Pandas is basically Microsoft Excel and spreadsheets for python. The line that begins “df=…” is loading our data into a Pandas spreadsheet (called a “dataframe”). “re” and “string” are two libraries that will help in dealing with text. We will further explain their use when appropriate. “nltk” is Natural Language Toolkit and it is a popular library in dealing with NLP problems. The “lemmatizer” object is a package found in a sub-module of nltk that is used to identify the root of words. There are other options to accomplish this task but the idea is that when we investigate a sentence we want to stop getting confused by similar words. Example: “I am posting posts which will later be posted and re-posted following each post.” Ok, so this sentence doesn’t make a whole lot of sense, but it demonstrates a point; this sentence is talking about posts. We have 5 different words which are all related to the word “post.” Why create a new way to read each unique version of the word “post” when we can just create the following sentence: “I am post post which later be post and post following each post.” The sentence makes even less sense but we still know that this sentence is talking about posts. That’s the idea; work with as few words as possible without losing context or meaning. For more information on the backend work, you can click here. Finally, wordnet is sort of like a dictionary-type resource found in nltk. I’ll give you a quick example to show what I mean.

Cool 😎

Data Prep Functions


To get started here, I am going to minimize this data set using pd.DataFrame().sample(n) with n = 5000. This way my code will take less time and memory to run. I am going to cut my data from 40k rows to only 5k rows. Usually, having more data leads to more accurate models. However, seeing as this is more of an instructive post, I’m going to keep things a bit less computationally heavy. Note that it’s important to reset the index, by the way.

Next, we’ll take a look at “regular expressions,” commonly described as “regex.” Regex is basically “a sequence of characters that define a search pattern,” to quote Wikipedia. Regex is primarily used to process different parts of a sentence and identify things like numbers, punctuation, or other things. For example, if we had the following sentence: “Oh my god, we’re having a fire sale!” – we can understand this sentence without the exclamation mark. The punctuation makes the sentence a bit more interesting, but for computer processing purposes, it’s just added noise. Regex is a bit of a strange resource in syntax and code but I will describe all the regex patterns we will see in our function in a visual. (For more information I found this resource)

We will actually need to add one further cleaning function before we can start lemmatizing words. The function below get’s rid of quotes, empty lines, and single characters sitting in sentences.

For the next function we build, we are going to reduce the amount of words we see using a lemmatization process. Before we can do that, however, we will need to understand how nltk assigns tags. Let’s give an example:

Ok, let’s break this down. First things first, forget every letter after the first letter. Next, figure out what ‘VB’ and ‘NN’ mean. According to this resource, “NN” indicates a noun while “VB” indicates a verb. These tags will help us understand how the lemmatizer should take action. We’ll see more tags in our function:

Now that we can access word tags with a default value set in mind, we need to lemmatize our words. This function is quick.

So let’s take a look at what all this accomplished. We started with something like this:

And now…

It doesn’t look so pretty, but it’s definitely an improvement.

EDA

In short, we will not be doing much EDA. There’s a lot of interesting EDA that can be done with NLP projects. This post is more about building a classification model and we will therefore skip EDA. (Disclaimer EDA can and usually does help build better models – but we are keeping things basic here). If you want to see a fun blog about custom word clouds check out my post here.

Transforming Text To Numbers

Now that we cleaned up are text, we need to turn text into something that computers can understand; numbers. Count vectorizers allow us to accomplish this text. In a short amount of code we can turn a single entry of text into a row whose features are words and the frequency the words appear per text. Let’s say we had the following two sentences; 1) The weather is nice. 2) The weather isn’t cold. So for these two sentences we have 6 total unique words which leads to a data frame including 6 features (not including the classification label). Let’s see some code.

What we see above is the import and instantiation of a count vectorizer which is then applied to the text and exported to a data frame. We also add the label as an additional column. What we see in the data frame is weird. We see words like “aaaaaaah” and “aaa.” However, these words don’t appear in the first 5 lines of data and I would imagine they are statistical outliers. We don’t really see any normal words above and that’s why we see a bunch of zeros.

Stopwords

Believe it or not, we have more data cleaning. A lot of people probably filter out stop-words earlier but I like to do it once we create a data frame. What are stop words? Glad you asked! Stop words are words that “don’t matter” as I like to say it. Stop words could be basic like “the,” “and,” and “it” or situational like “movie,” “film,” or “viewing” in our case. Python has libraries that actually give you sets of stop words. Let’s take a look. Notice how we have to specify the language.

Now I know said no EDA, but I’ll share with you one quick visual.

This visual screams out: “we need more stop words!” Also… what the heck is “br?”

I created the code below to delete the 194 words listed in stop_words if they appear as columns in our data:

We still have a pretty even distribution of good reviews to bad reviews.

Models

So we are basically done with the core data prep and can now run some models. Let’s start with assigning X and Y and doing a classic train-test-split.

Let’s import and instantiate some models…

Let’s create a function to streamline evaluation…

Let’s run a random forest classifier model…

Now that’s pretty good. If some of these metrics look confusing, I recommend you view my blog here that describes machine learning metrics and confusion matrices. At this point in a classification model I like to look at feature importance. We have over 42k features, so we’re definitely not doing feature importance. Let’s focus on what matters. We just built a strong NLP classification model using 5000 data points.

Conclusion

NLP projects take a lot of planning and attention to detail. That said, there is a lot of depth potentially available in NLP projects and having a good knowledge of NLP can help you perform interesting and advanced analysis. NLP is not as easy to learn and implement as some more “basic” low-dimensionality models but NLP is a highly valuable and impressive skill to hold. I hope this post helps readers conduct their own NLP analysis.

Statistical Power, Part 2

Determining power in hypothesis testing for confidence in test results

Image result for ive got the power!

Introduction

Thanks for visiting my blog.

Today’s post concerns power in statistical tests. Power, simply put, is a metric of how reliable a statistical test. One of the inputs we will see later on pertains to effect size, which I have a previous blog on. Power is usually a metric one calculates before performing a test. The reason we do this is because low statistical power may nullify test results. Therefore, we can save time and skip all the effort required to perform a test if we know our power is low.

What actually is power?

The idea of what power is and how we calculate power is relatively straight-forward. The mathematical concepts, on the other hand, are a little more complicated. In statistics we have two important types of errors; type 1 and type 2. Type 1 error corresponds to a case of rejecting the null hypothesis when it is in fact true. In other words, we assume input has effect on output when it actually does not. The significance level in a test, alpha, corresponds to type 1 error and represents the probability of type 1 error. As we increase alpha, we may see a higher probability of rejecting the null hypothesis, but our probability of type 1 error increases. Type 2 error is the other side of the coin; we don’t reject the null hypothesis when it is in fact false. Type error is linked to statistical power in that power, as a percentage, can be characterized as the complement of type 2 error probability. In other words, it is the probability that we reject the null hypothesis given that it is false. If we have a high probability that we made the correct prediction, we can enter a statistical test with confidence.

What does this all look like in the context of an actual project?

We know why power matters and what it actually is statistically. Now that we know all this, it’s time to see statistical power in action. We’ll use python to look at some data, propose a hypothesis, find the effect size, solve for statistical power, and run the hypothesis. My data comes from kaggle (https://www.kaggle.com/datasnaek/chess) and concerns chess matches.

Here’s a preview of the data:

My question is as follows: do games that follow the King’s Pawn process take about as long as games that follow the Italian Game process. Side note: I have no idea what an Italian Game is, or most of the openings listed in the data. We start by looking at effect size. It’s about 0.095, which is pretty low. Next we input the data of turn length from Italian Game processes and King’s Pawn processes. Implicit in this data is everything we need; size, standard deviation, and mean. If we set alpha to 5%, we get a statistical power slightly above 50%. Not great. Running a two-sample-t-test leads to a 3.67% p-value which tells us that these two openings lead to games of differing lengths. The problem is power is low, so it wasn’t quite worth running these tests. And that… is statistical power in action.

Conclusion

Statistical power is important as it can modify how we look at hypothesis tests. If we don’t take a look at power, we may be led to the wrong conclusions. Conversely, when we believe to be witnessing something interesting or unexpected, we can use power to enforce our beliefs.

Statistical Power, Part 1

An examination of the role effect size plays in whether one can trust their tests or not

How to calculate Cohen d effect size - YouTube

Introduction

Thanks for visiting my blog today!

Today’s blog concerns statistical power and the role it plays in hypothesis testing. In very simple terms, power is a number between 0% and 100% that tells us how much we are able to trust a statistical test. Let’s say you have never been to southern Illinois, you go there one day in your life, and on that day you witness a tornado. First of all, I’d feel really sorry for you. With this data, though, we might naïvely assume that every day spent in southern Illinois sees a tornado take place. We literally have no other data to refute this claim, so this is, in fact, not that crazy. Except, you know, we only looked at ONE data point. If we had the exact same story, except you saw 500 straight days of tornados, we still have the same ratios of tornados to days spent in southern Illinois, but we now would have confidence in our test if we were to predict that southern Illinois suffers from daily tornados. This is the idea here; just because a statistical test results in a certain outcome, this doesn’t mean that we can immediately trust our result. When people discuss the idea of statistical power, a key metric that helps them make decisions is effect size. Today we’ll discuss effect size and once we understand this concept well, we’ll move on to statistical power.

What is effect size and why does it matter?

To answer the question above backwards, effect size matters as it is a key input in calculating statistical power. Effect size actually can characterized in a couple different ways in terms of definition. Effect size also has a couple variations on the metrics used. For this post, I will focus on what I believe to be the most common metric and we will also assume that effect size refers to a normalized (transcends units) difference between related groups (usually a control group and a experimental group) in hypothesis testing. In particular, if we are looking at the distribution of two related groups, then we assign the variable known as d (for distance) to the difference between the means in the two distributions. Let’s do a quick example; Let’s say we survey athletes who practice 2 hours a day and people who practice 5 hours a day. The metric d tells us about the difference in how long you practice in terms of effect on production. If we have high effect size, we can assume that more practice has an effect on higher production. Otherwise, it’s may seem like a waste of time to practice 3 extra hours.

How do we calculate effect size?

A common way to calculate d is by subtracting the second mean from the first mean and then divide that difference by a pooled standard deviation. The numerator is easy; one mean minus the other. The denominator, though…

It looks messy, but n refers to number of observations while s refers to standard deviation. Each contains a subscript to identify the two distributions. It’s not that bad. It’s a bit of a long and annoying calculation, but by no means complex.

Conclusion

This post introduced gave a gentle and simple understanding of effect size. We discussed the idea and later saw a simple yet descriptive example coupled with an equation to solve for effect size. The follow up to this post will discuss how we take effect size and add it to the statistical power equation to better understand how trustworthy a statistical test may be before we spend time and effort conducting said test.

Z Scores in Hypothesis Testing

Understanding the use of z scores in performing statistical inquiries

Introduction

Thanks for visiting my blog today!

Today’s blog concerns hypothesis testing and the use of z scores to answer questions. We’ll talk about what a z score is, when it needs to be used, and how to interpret the results from a z score-related analysis. While you may or may not be familiar with the term z score, you are very likely to have encountered the normal distribution / bell curve depicted above. I tend to think almost everything in life, like literally everything, is governed by the normal distribution. It’s got a low amount of mass toward the “negative” end, a lot of mass in the middle, and another low amount of mass toward the “positive” side. So if we were to poll a sample of a population on any statistic, say athletic ability, we will find some insane athletes like Michael Phelps or Zach Lavine, some people who are not athletic at all, and everyone else will probably fall into the vast “middle.” Think about anything in life, and you will see the same distribution applies to a whole host of statistics. The fact that this normal / bell-curve is so common and natural to human beings means that people get comfortable using it when trying to answer statistical questions. The main idea of a z score is to see where an observation of data (say IQ of 200, I think that’s a high IQ) falls on the bell curve. If it falls smack in the middle, you are probably not an outlier. On the other hand, if you’re IQ is so high that there is almost no mass at the area of that IQ, we can assume you’re pretty smart. Z scores create a demarkation point that allows us to make use the normal distribution.

When do we even need the z score test in the first place?

We use the z score to see how much a sample from a population represents an outlier. We will need to also use a threshold to decide at what point we call an observation a significant outlier. In hypothesis testing, “alpha” refers to the threshold where we decide whether something is an extreme outlier or not. Often, alpha will be 5%. This means that if the probability of something not being an outlier is 5% or lower, we can assume it is a true outlier. On the standard normal distribution graph (mean zero, standard deviation 1), 5% usually corresponds to 1.96 standard deviations away from the mean of zero. This means if our z score is greater than 1.645 or less than -1.645, we are witnessing a strong outlier. If we have two outliers, we can look at their respective z score to see which outlier is more extreme.

How do we calculate a z score?

It’s actually pretty simple. A z score is equal to the particular observation minus the population mean. That value just described above is then divided by the standard deviation of the population.

Z Score Formula - Z Score Table

Example: if we have a distribution with mean 10 and standard deviation 3, is an observation of 5 a strong outlier? 5-10 = -5. -5/3 = -1.67. So at alpha = 5%, this is a strong outlier. If we restricted alpha and decreased it to 2%, 5 is no longer such a strong outlier. So basically 5 is 1.67 standard deviations from the mean and does represent a significant outlier under alpha at 5%.

If we don’t know the full details of an entire population, things change slightly. Assuming we have more than 30 data points in our sample, the equation becomes observation minus sample (not population) mean. That quantity is then first multiplied by the sample size and then divided by the sample standard deviation.

Z scores, Z test and Probability Distribution | Data Vedas

This process also works if we are trying to evaluate a broader trend. If we want to look at 50 points from a set of 2000 points and see if those 50 points are outliers, we take the mean of 50 points and insert that value as our “observation” input.

Ok, so what happens when we have less than 30 data points? I have another blog to explain what happens there currently in the works.

Conclusion

The z score / z statistic element of hypothesis testing is quite elegant due to its simple nature and connection to the rather natural-feeling normal distribution. It’s an easy and effective tool anyone should have at their disposal whenever trying to perform a meaningful statistical inquiry.

Thanks For Reading!

Was Gretzky Really THAT Great?

(I used to genuinely question Gretzky’s greatness and the data helped me make my decision)

A unique approach to evaluate NHL players by accounting for era effects

Wayne Gretzky by the numbers: A look at 'The Great One's' NHL career |  Sporting News Canada
The Great One

Introduction

Thank you for visiting my blog!

Let’s get right into this blog as there isn’t a whole to be said in the introduction other that we are going to build an exciting and unique analysis of every NHL player from every NHL season (up until 2018-19).

Project Goal

A while back, I set out to develop a system to evaluate NHL and NBA players (like every one ever to play a second at the professional level) and see how they measure against their peers. I worked on data engineering and creating a database as well designing an optimal way to evaluate players. For today’s blog, I’m going to share part of that project with you in an interactive and visual-driven way. I have created a Tableau public project that will allow me share some insights with you, the reader, in a way driven by you, the reader. My project allows users to pick their own filters and ways to view my data. All you need to know for now is this: when you see that a good player’s goal statistic is, I don’t know, like 3.513, it means that the player in question was 3.513 times better than league average in goals that year. If the average NHL player scores 5.5 goals per year, the player in question probably scored ~19 goals. It doesn’t sound like a lot of goals to score in an 82-game season to the casual fan, but it’s actually not that bad. Just keep in mind while you view my project that some stats were not recorded until more recent years. If you look up how many hits Maurice Richard or Eddie Shore had in any season of their careers, you will likely find no information. To see different pages from the various visuals, scroll down to where it says “Metadata” and click on different sheets. Also, as you adjust your filter preferences, keep in mind that you do not want to overload the system. So looking for every name of every player to play in the 2006 season, for example, is a lot more annoying than looking at every Blackhawks player in 2006 or every player who had at least 4 times the league average of goals in 2006. I really like the system of comparing actual stats to averages because it allows you to understand everything in context. If someone scores 200 goals in a season, for example, you may assume he’s better than any current player as no one has even come close to 70 goals in recent years (most goals ever in a season is 92 I think – so this obviously just a test-case). However, if the season in question saw almost every player reach at least 8000 goals (again, just a test-case), than the player with 200 goals kind of sucks. With relative scores, we don’t have this problem. It’s similar to feature scaling in data science ($100 is a lot to pay for a candy bar but rather cheap for a functional yacht). My system is susceptible to the occasional glitch, especially if a player was traded late in the season, but overall works quite well.

The Gretzky Question

To follow up on my comment earlier about Gretzky, I’d like to share one visual users can navigate to in my project on their own if they go to the “Player Goal Assists” tab and filter for Edmonton Oiler stats from 1980 to 1989 and only include players who averaged at least the league average in goals and assists across those 10 seasons. The red bars indicate how much better one player was compared to the league in assists and the teal represents goals. If you know hockey, you see guys like Jari Kurri, Mark Messier, and Paul Coffey, who are all superstars. Paul Coffey is actually one of my favorite all time players (and favorite defensemen) in the pool of players-I-never-saw-play. However, none of the players mentioned above (all hall of famers who have each one at least one individual trophy and have also each won multiple Stanley Cups) compare to Wayne Gretzky (second from end right). So, yeah, he was pretty darn good even after accounting for era effects and taking into account his superstar teammates.

Link

So now that I have talked about the project and how to navigate your way around it, here comes the link…

But first… keep in mind that you guide this project using the interactive filters on the right hand side of the page – use those filters!

https://public.tableau.com/profile/joseph.cohen2401#!/vizhome/relative_hockey/Sheet0

Conclusion

Tableau is great! I only know the basics, though, and am still getting my feet wet. I definitely see the possibility of updating the Tableau project linked above and diving deeper into more interesting and exciting visualizations. If you, the reader, liked my data visualization system, I recommend you also learn some of the Tableau basics as its a fairly simple software. I hope you found some interesting stats and stories in today’s inquiry.

Thanks for Reading!

hockey gifs: michael del zotto breaks camera with shot GIF

Decision Trees, Part 3

Understanding how pruning works in the context of decision trees.

Post-pruning techniques in decision tree | by Z² Little | Medium

Introduction

Thank you for visiting my blog today!

In previous posts, I discussed the decision tree model and how it mathematically goes along its different branches to make decisions. A quick example of a decision tree is the following: if it rains I don’t go to the baseball game, otherwise I go. Assuming it doesn’t rain, if I go to the game and the score has one team winning by 5 or more runs by the eighth inning I leave early, otherwise I stay. Here the target variable is whether I will be at the stadium under different unique situations. Decision tree models are very intuitive as it is part of human nature to create mental decision trees in everyday life. In machine learning, decision trees are a common classifier but they have many flaws that are, in fact, able to be addressed. Let me give you an example. Say we are trying to figure out if Patrick Mahomes (NFL player) is going to throw for 300 yards and 3 touchdowns in a given game and among other information we know about the game, we know that he is playing the Chicago Bears (as a Bears fan it is hard to mention of Mahomes and the Bears in the same sentence). For all you non-football fans – Patrick Mahomes, as long as he stays with the Chiefs, will almost never play the Bears. I’m serious about this. According to the structure of the NFL, they will only play each other once in every four years for one game only (with the exception of possibly meeting in the Super Bowl leading to a maximum of five meetings in a four-year period). The problem we have with this situation is that whether or not the Bears win this game, we haven’t really learned anything meaningful because this situation is rather uncommon and a fluke may occur and therefore this observation only serves to cloud our ability to analyze this situation. I would imagine if we had the same exact situation, but did not mention that the team being played was the Bears, and all we knew was the rankings of the teams and other statistics, we would have a much higher accuracy when predicting the game’s outcome (and performance of Mahomes). That’s what pruning is all about; getting rid of the extra information that doesn’t teach you anything. This is not a novel idea. Amos Tversky and Daniel Kahneman talk about the idea that adding additional information to a problem or question often confuses people and leads them to the wrong conclusions. Say I told you that there was an NFL player who averaged 100 rushing yards per game and 20 receiving yards per game. If I were to ask you whether it’s more likely that he is a NFL running back or an NFL player, you may think with absolute certainty that he is a running back (and you’d probably be right) but since the running back position is a subset of being an NFL player, it is actually more likely that he is an NFL player. You laugh when you read this now but this is actually a fairly common mistake. Anyway, pruning is the process of cutting off lower branches of a tree (top-down approach) and eliminating noise. Getting back to the first example of whether I stay at the baseball game, to prune that tree – if we were to assume I never leave games early – the only feature that matters is the presence of rain and we could cut that tree after the first branch. So let’s see how this actually works.

Fundamental Concept

The fundamental concept is pretty simple, we look at each additional continuation of the tree and see if we actually learn an amount of significant or information or that extra step doesn’t really tell us anything new. In python, you can even specify how deep you want or trees to be. However, that still leaves the question as to how we statistically determine a good stopping point. We can guess-and-check in python with relative ease until we find a satisfying stopping point, but that isn’t really so exciting.

Statistical Method

So this is actually somewhat complex. There are two common methods. There is the cost complexity method and the chi-square method. The cost complexity method operates similarly to optimizing a linear regression using gradient descent in the sense that you leverage calculus to find a minimum. Using this method you create many trees that are all of varying length and solve for the one that leads to the highest accuracy. This concept is not novel to statisticians or data scientists as optimizing a cost function is a key tool in creating models. The chi-square method uses the familiar chi-square test to basically look at each subsequent branch of the tree actually matters. In the football example above, we learn next to nothing from a game between the Bears and Chiefs as they can play a maximum of 13 games against each other in a ten-year period assuming they meet in ten straight super bowls. The Chiefs probably average 195 games in a ten-year period including a minimum of 20 games against the Broncos, Raiders, and Chargers each individually per ten-year period. In python, scipy.stats has a built-in chi-square function that should allow you to perform the test. I currently have a blog in the works with more information on the chi squared test and will provide that link when that blog is released.

Conclusion

Decision trees are fun and intuitive and drive our everyday lives. The issue with them is they can easily overfit. Pruning trees allows us to take a step back and look for broader trends and stories instead of focussing in on features that are two specific to provide any helpful information. Hopefully, this blog can help you to start thinking about ways to improve decision trees!

Thanks for reading!

Gifprint - Convert Animated Gifs to Printable Flipbooks

Dealing With Imbalanced Datasets The Easy Way

Imposing data balance in order to have meaningful and accurate models.

Understanding Imbalances - Chess Forums - Chess.com

Introduction

Thanks for visiting my blog today!

Today’s blog will discuss what to do with imbalanced data. Let me quickly explain what I’m talking about for all you non-data scientists. If I am screening people too see if they have a disease and I accurately screen every single person (let’s say I screen 1000 people total). Sounds good, right? Well, what if I told you that 999 people had no issues and I predicted them as not having a disease. The other 1 person had the disease and I got it right. This clearly holds little meaning. In fact, I would basically hold just about the same level of overall accuracy if I had predicted this diseased person to be healthy. There was literally one person and we don’t really know if my screening tactics work or I just got lucky. In addition, if I were to have predicted this one diseased person to be healthy, then despite my high accuracy, my model may in fact be pointless since it always ends in the same result. If you read my other blog posts, I have a similar blog which discusses confusion matrices. I never really thought about confusion matrices and their link to data imbalance until I wrote this blog, but I guess they’re still pretty different topics since you don’t normally upsample validation data, thus giving the confusion matrix its own unique significance. However, if you generate a confusion matrix to find results after training on imbalanced data, you may not be able to trust your answers. Back to the main point; imbalanced data causes problems and often leads to meaningless models as we have demonstrated above. Generally, it is thought that adding more data to any model or system will only lead to higher accuracy and upsampling a minority class is no different. A really good example of upsampling a minority class is fraud detection. Most people (I hope) aren’t committing any type of fraud ever (I highly recommend you don’t ask me about how I could afford that yacht I bought last week). That means that when you look at something like credit card fraud, the majority of the time a person makes a purchase, their credit card was not stolen. Therefore, we need more data on cases when people are actually the victims of fraud to have a better understanding of what to look for in terms of red flags and warning signs. I will discuss two simple methods you can use in python to solve this problem. Let’s get started!

When To Balance Data

For model validation purposes, it helps to have a set of data with which to train the model and a set with which to test the model. Usually, one should balance the training data and leave the test data unaffected.

First Easy Method

Say we have the following data…

Target class distributed as follows…

The following code below allows you to extremely quickly decide how much of each target class to keep in your data. One quick note is that you may have to update the library here. It’s always helpful to update libraries every now and then as libraries evolve.

Look at that! It’s pretty simple and easy. All you do is decide how many of each class to keep. After that, a certain number of rows resulting in one target feature outcome and a certain number of rows resulting in an alternative target feature outcome remain. The sampling strategy states how many rows to keep from each target variable. Obviously you cannot exceed the maximum per class, so this can only serve to downsample, which is not the case with our second easy method. This method works well when you have many observations from each class and doesn’t work as well when one class has significantly less data.

Second Easy Method

The second easy method is to use resample from sklearn.utils. In the code below, I decided to point out that I was using train data as I did not point it out above. Also in the code below, I generate new data of class 1 (sick class) and artificially generate enough data to make it level with the healthy class. So all the training data stays the same, but I repeat some rows from the minority class to generate that balance.

Here are the results of the new dataset:

As you can see above, each class represents 50% of the data. This method can be extended to cases with more than two classes quite easily as well.

Update!

If you are coming back and seeing this blog for the first time, I am very appreciative! I recently worked on a project that required data balancing. Below, I have included a rough but good way to create a robust data balancing method that works well without having to specify the situation or context too much. I just finished writing this function but think it works well and would encourage any readers to take this function and see if they can effectively leverage it themselves. If it has any glitches, I would love to hear feedback. Thanks!

Conclusion

Anyone conducting any type of regular machine learning modeling will likely need to balance data at some point. Conveniently, it’s easy to do and I believe you shouldn’t overthink it. The code above provides a great way to get started balancing your data and I hope it can be helpful to readers.

Thanks for reading!

Abbey Code

A Picture Is Worth 1000 Words. In This Case, I Decided To Stick With 400.

The Simpsons in Abbey Road by rastaman77 on DeviantArt

Introduction

Thanks for visiting my blog today!

For those of you who may not know, I love music and also play a couple instruments. One of my top 3 favorite bands of all time is The Beatles (#1 is Chumbawamba). The Beatles do not need an introduction as they are the most influential musical group in history.

Today, I’ve got a blog about the Beatles and their lyrics. I will later do some topic modeling and discuss how I might run an unsupervised learning algorithm with Beatles lyrics. For today, however, I’m going to share how I created a customized word cloud. That may not sound terribly exciting, but trust me when I say that this will be fun and useful.

Data Collection

First things first, we need some data as this is part of a larger topic modeling project. Now I’m sure that I can find a data repository or two with Beatles lyrics, but I decided to leverage web scraping. I found a lyrics website called lyricsfreak.com (https://www.lyricsfreak.com/b/beatles/) and web scraped the links for every song and later went into every link to extract lyrics via more web scraping and put them into a data frame. Interestingly, a couple of my songs were literally just short speeches (that were classified online as a speech, thankfully). One limitation of this source is that the website sometimes cuts repeated lyrics. I first noticed this when I was checking the lyrics of “All My Loving.” It’s a great song that hopefully you’ve heard before. All the unique phrases and groups of lyrics in the song are listed but it doesn’t repeat some of them even though the song itself does. Also, they don’t have every song. It was a little tricky to find a good website for lyrics that would work well with web scraping so I will be sticking with a slightly limited amount of data for this blog. I still think my results will be highly representative. You’ll see what I mean if you know The Beatles. So just a quick recap: I web scraped all my lyrics. More importantly, the way I performed this task was rather robust and I now believe I can quickly and easily scale my process to web scrape a whole discography worth of lyrics from any other band. We’ll see if anything happens with that some time in the future.s

Data Cleaning

I mentioned speeches. The first step in this process was to get rid of those. I’ll show you all the libraries I used (so keep them in mind for later) and what these speeches looked like:

Imports:

Some songs:

One speech:

Here’s all the speeches:

Let’s take a look at one song. I picked A Day In The Life as it was the first non-speech and also is widely considered to be the greatest Beatles song ever written given it’s advanced composition (I know a bunch of readers are going to disagree and say that either a song like Hey Jude or Strawberry Fields Forever is better or potentially contend that early Beatles music is better than later Beatles music. You’re entitled to your opinion; this blog is not an authoritative essay on what the best Beatles song may be).

By the way, the last chord in A Day In The Life (https://www.youtube.com/watch?v=YSGHER4BWME&ab_channel=TheBeatles-Topic around the 4:19 mark) is an E major, even though the song is in the key G major which does not have a G# note, necessary for an E major chord, in the scale. We call that move from E minor to E major (by changing the G note to a G# note) a “Picardy Third” in music theory and that difference is part of what makes this last chord so magical. If you’ve never heard the song, you’re missing out on possibly the most famous single chord in Beatles history. The other contender is the first chord (and literally the first thing you hear) in “A Hard Day’s Night.” Google says this other chord is an Fadd9 (adding a high G note to the F chord whose basic composition is just an F, A, and C note). (Special thanks to https://www.youtube.com/watch?v=jGaNdKabvQ4&ab_channel=DavidBennettPiano).

Ok, hopefully that made a little bit of sense or at least sparked some intrigue, but back to data cleaning. You may notice that the lyrics are written as a list. Here is how I dealt with that problem:

Here is a cleaning function designed to remove annoying characters like digits and punctuation:

Here, I combined every lyric into a list:

Next, I created a word count dictionary:

I earlier imported stop words (words like “the” that don’t help a whole lot) and here I have removed them and created a new list:

That’s basically it.

Word Cloud

So here is the basic word cloud (notice we are using generate_from_frequencies function to use the dictionary created above):

Looks pretty simple… and boring. Let’s try and make this a bit cooler. Like wouldn’t it be nice if we could work in an actual Beatles theme? How about the iconic Abbey Road album cover? Here is the picture you’ve likely seen before:

Why The Beatles' Abbey Road Album Was Streets Ahead Of Its Time

First, I decided to find a silhouette online that is a bit more black-and-white. I found this picture:

To actually use this picture, we will need to convert it to a numpy array. I’ve heard the term mask used to describe this process. I’ll copy the file path into python to get started.

What does it look like now?

It’s a bit messy, but…

And one step further…

Word clouds in python allow you to pass in a mask to shape your word cloud. In the code below, we basically have the same word cloud but have just added a mask.

Output:

I arrived at the magic number of 400 words through trail-and-error. I needed enough words to make a logo full and capture the letters of “The Beatles” and individual silhouettes while still avoiding having too many words and making each word hard to read and identify.

In terms of design aesthetics, we are almost done here. The color scheme doesn’t look great. Conveniently, word clouds let you pass in colors.

Output:

That looks a lot better now that we are using a new colormap. Interestingly, the word that stands out the most is “love.” The Beatles were well known for writing love songs and that is in fact the most common word after data cleaning..

Conclusion

Word clouds are fun and effective. Word clouds can also be utilized in different ways. If you want to customize your word clouds, you can find an image or two that stand out to you, copy the path name (or bring it into the folder), and then just work out the details within the code. It’s pretty scalable. We were able to see in this blog a process of web scraping lyrics, cleaning data, and creating an exciting and unique visualization at the end.

Thanks for reading!

Sources and further reading

(https://towardsdatascience.com/create-word-cloud-into-any-shape-you-want-using-python-d0b88834bc32)

Basic AutoGluon Models

Learning the basics of a useful AutoML library

GitHub - awslabs/autogluon: AutoGluon: AutoML Toolkit for Deep Learning

Introduction

Thank you for visiting my blog today!

Recently, I was introduced to an interesting library geared toward building fast and accurate machine learning models using a library called AutoGluon. I don’t claim credit for any of the fancy backend code or functionality. However, I would like to use this blog as an opportunity to quickly introduce this library to anyone (and I imagine that includes most people who are data scientists) and show a quick modeling process. A word I used twice in the past sentence was “quick.” As we will see, that is the one of the best parts of AutoGluon.

Basic Machine Learning Model

In order to evaluate whether AutoGluon is of any interest to me (or my readers), I’d like to first discuss what I normally want from an ML model. For me, outside of things like EDA, hypothesis testing, or data engineering, I am mainly looking for two things at the end of the day; I want the best possible model in terms of accuracy (or recall or precision) and also want to look at feature importances as that is often where the interesting story lies. How we set ourselves up to have a good model that can accomplish these two tasks in the best way possible is another story for another time and frankly it would be impossible to tell that entire story in just one blog.

An autogluon Model Walkthrough

So let’s see this in action. I will link the documentation here before I begin: (https://autogluon.mxnet.io/). Feel free to check it out. Like I said, I’m just here today to share this library. First things first though: my data concerns wine quality using ten predictive features. These features are citric acid, volatile acidity, chlorides, density, pH level, alcohol level, sulphates, residual sugar, free sulfur dioxide, and residual sulfur dioxide. It can be found at (https://www.kaggle.com/uciml/red-wine-quality-cortez-et-al-2009). This data set actually appears in my last blog on decision trees.

Ok, so the next couple lines are fairly standard procedure, but I will explain them:

Basically, I am loading all my functions, loading my data, and splitting my data into a set for training a model and a set for validating a model.

Here comes the fun stuff:

So this looks pretty familiar to a data scientist. We are fitting a model on data and passing the target variable to know what is being predicted. Here is some of the output:

That was fast. We also what models worked best.

Now let’s introduce new data:

Output:

Whoa Keanu GIFs | Tenor

Whoa is right, it looks we just entered The Matrix. Ok… this is really not that complex, so let’s just take one more step:

Output:

Ok, now that makes a bit more sense.

We can even look backward and check on how autogluon interpreted this problem:

We have a binary outcome of 0 or 1 containing features that are all floats (numbers that are not necessarily whole).

What about feature importance?

So we see our feature importances above, and run time also. This library is big on displaying run times.

Conclusion

AutoGluon is an impressive python library that can accomplish many different tasks in a short amount of time. You can probably optimize your results by doing your cleaning and preprocessing, I would imagine. Whether this means upsampling a minority class or feature selection, you still have to do some work. However, if you are looking for a quick and powerful library, AutoGluon is a great place to start.

Thanks for Reading!

Thank You Text On Binary Stock Footage Video (100% Royalty-free) 27866767 |  Shutterstock